Changing your web hosting server is easier than you think. It involves a few steps to transfer your website smoothly.
Many website owners face the need to change their web hosting server at some point. Reasons may include better performance, lower costs, or improved customer support. Understanding the process is crucial to avoid downtime and data loss. This guide will walk you through the steps to change your web hosting server.
By the end, you’ll have a clear path to move your website efficiently. Whether you’re a beginner or experienced, these steps will help ensure a seamless transition. Let’s dive in and make the switch as smooth as possible.
Choosing A New Web Hosting Provider
First, understand your website’s needs. Do you need more storage? More bandwidth? Decide what is most important. Think about your site’s traffic. More visitors need more resources. Consider the type of website you have. A blog needs different features than an online store. Write down your requirements. This will help you compare options later.
Look for trusted hosting providers. Read reviews from other users. Check their uptime guarantee. A good host should have 99% uptime. Compare prices and features. Some hosts offer free domain names. Others give free SSL certificates. Make sure they have 24/7 support. Good support is very important. Compare multiple providers. Choose the one that fits your needs best.

Credit: blog.fosketts.net
Backing Up Your Website
Manual backups need more work. First, open your hosting control panel. Find the file manager option. Download all your website files. Next, export your database. This step is important. Use phpMyAdmin to export the database. Save it to your computer. Manual backups take time. But you control everything.
Automated tools make backups easy. They save time. Some tools are free. Others need payment. Popular tools include UpdraftPlus and BackupBuddy. Set them up once. Then they work on their own. They backup files and databases. Regular backups keep your site safe. Automated tools reduce mistakes. They are very reliable.
Downloading Your Website Files
Transfer your website files to your computer before changing the hosting server. This ensures all data remains safe and accessible.
Using Ftp Clients
First, get an FTP client like FileZilla. Install it on your computer. Open the FTP client. Enter your FTP server address, username, and password. Connect to your server. Find the public_html folder. This folder has your website files. Select all files inside this folder. Drag them to a folder on your computer. Wait for the transfer to finish. Now you have a backup of your website files.
Cpanel File Manager
Log into your cPanel account. Go to the File Manager. Open the public_html folder. This folder contains your website files. Select all files inside. Click on the “Compress” button. Choose ZIP format for the file. Download the ZIP file to your computer. Now you have a backup of your website files.

Credit: mazepress.com
Exporting Your Database
Exporting your database is essential for changing web hosting servers. Use your hosting control panel to export the data. Save the file securely for easy import into the new server.
Using Phpmyadmin
Log in to your web hosting control panel. Find the phpMyAdmin icon and click on it. Select the database you want to export from the left-hand side. Click the “Export” tab at the top. Choose the “Quick” export method for simple export. Select “SQL” as the format. Click “Go” to download the database file to your computer.
Command Line Methods
Access your server through SSH. Use the command line to export your database. Type mysqldump -u username -p database_name > backup.sql. Replace “username” with your database username. Replace “database_name” with the name of your database. The command will create a file named backup.sql in your current directory. Ensure you have the necessary permissions to perform this action. The file will contain all your database data.
Uploading Files To New Server
Switching to a new web hosting server involves uploading files to the new server. This process ensures your website runs smoothly on the new host. Follow simple steps to transfer your files seamlessly.
Using Ftp Clients
FTP clients are tools. They help upload files to a server. Download a good FTP client. FileZilla is popular. Install it on your computer. Open the FTP client. Enter your new server’s details. This includes your username and password. Connect to the server. Now, you can drag and drop files. Move your website files to the new server.
Cpanel File Manager
cPanel File Manager is another tool. It helps upload files. Log in to your cPanel account. Find the File Manager icon. Click on it. You will see your files. Use the upload option. Choose files from your computer. They will upload to the new server. This method is simple and easy.

Credit: diggitymarketing.com
Importing Your Database
phpMyAdmin is a popular tool. It helps you manage MySQL databases. First, login to your web hosting account. Open phpMyAdmin. Select your database. Then, click on the “Import” tab. Choose the database file you want to import. Click the “Go” button. Wait for the process to complete. Your database will be imported.
Command line methods are faster for large databases. First, open your terminal. Connect to your server using SSH. Use the command mysql -u username -p database_name < file.sql. Replace username, database_name, and file.sql with your details. Enter your password when asked. The import process will start. Wait for it to finish. Your database is now imported.
Changing Dns Settings
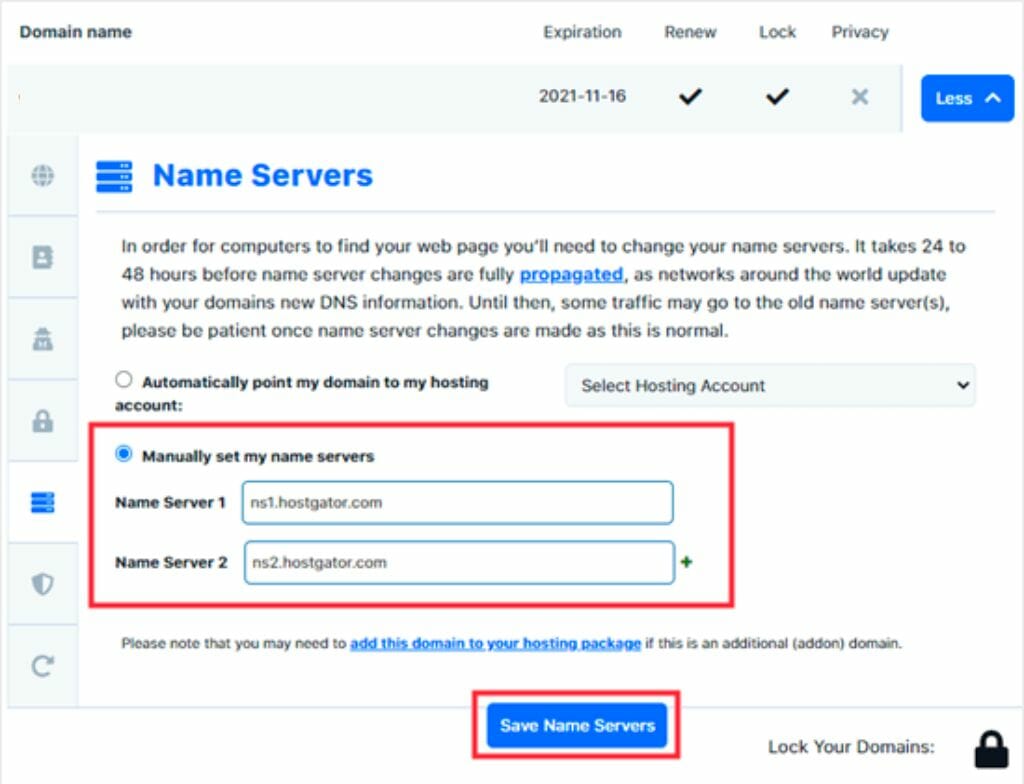
Nameservers tell the internet where your website is hosted. To update them, go to your domain registrar’s website. Find the option to manage DNS settings. Enter the new nameserver addresses provided by your new hosting provider. Save the changes.
Propagation is the time it takes for DNS changes to spread. It usually takes 24-48 hours. During this time, your site may be down. It is normal. Be patient.
Testing Your Website
Changing your web hosting server involves several steps. Ensure smooth transition by testing your website thoroughly on the new server. This helps identify potential issues before making it live.
Checking Functionality
Ensure all pages load properly. Click on every link. Check if they work. Test forms by filling them out. Make sure they submit correctly. View images on your site. Verify they are displayed. Try different browsers. See if the site looks the same. Check on mobile devices. Ensure the site is responsive. Test any special features. Confirm they operate smoothly.
Resolving Issues
Note any problems found during testing. List them in a document. Check error messages. Understand what they mean. Search online for solutions. Follow step-by-step guides. Fix broken links. Update URLs if needed. Adjust image settings if they do not display. Re-test the site after changes. Ensure issues are resolved. Keep fixing until the site works well.
Frequently Asked Questions
How To Change Web Hosting Server?
To change your web hosting server, first choose a new host. Backup your website files and databases. Update your domain’s DNS settings to point to the new server. Finally, upload your files to the new host.
Can I Switch Hosting Without Downtime?
Yes, you can switch hosting without downtime. Carefully plan the migration and test the new server before updating DNS settings. Use a temporary URL to verify everything works correctly.
Do I Need To Backup My Website?
Yes, always backup your website before changing hosting servers. This ensures you have a copy of your site in case anything goes wrong during the migration.
What Are Dns Settings?
DNS settings are configurations that direct internet traffic to your website. When you change your hosting server, you need to update these settings to point to your new server.
Conclusion
Switching your web hosting server is easier than you think. Follow the steps carefully. Ensure backup of all your important data. Test the new server thoroughly. Keep your website users informed about any downtime. This process boosts your website’s performance and reliability.
Regular server maintenance helps keep your site running smoothly. Remember, a reliable web host is key to a successful website. Don’t hesitate to seek expert help if needed. With these tips, you can confidently change your web hosting server.


